OSS Discovery User Guide
Table of Contents
- Section 1: Introduction to OSS Discovery
- Section 2: The Basics
- Section 3: Beyond the Basics
- Section 4: Filters and Rules
- Section 5: Help and Troubleshooting
Section 1: Introduction to OSS Discovery
What OSS Discovery Does
OSS Discovery finds installed open source software installed on a computer. It can be used to inventory open source software across an enterprise or on a single machine.
OSS Discovery capabilities include:
- Extensible library of project rules – OSS Discovery uses a library of open source "project fingerprint rules" to uniquely identify a wide range of open source software.
- Works with software distribution tools – Enterprises can use their existing software distribution tools to deliver OSS Discovery to multiple machines and remotely execute scans.
- Easy-to-understand results – Each OSS Discovery scan produces a text file listing the open source packages and versions found. The results of OSS Discovery scans can be reviewed for an individual system and can also be delivered to a server for aggregation and further analysis.
- Multi-platform – OSS Discovery scans workstations and servers running Windows, Linux, or Solaris operating systems.
- Contribute to The Open Source Census – OSS Discovery includes the option to anonymously contribute scan results to The Open Source Census. The Open Source Census is a global, collaborative project to collect and share quantitative data on the use of open source software in enterprise. Scan contributors can see summarized results for their scans as well as benchmark their open source usage against similar orgainzations. For more information, visit The Open Source Census website.
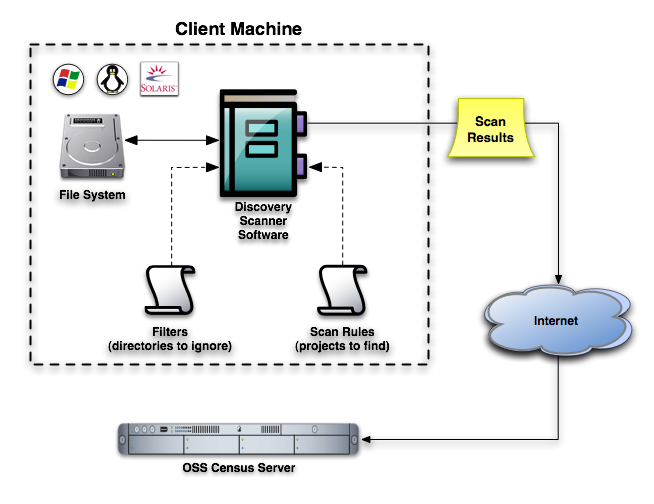
How OSS Discovery Works
OSS Discovery scans a file system on a computer looking for open source software.
OSS Discovery uses what are called fingerprints or project rules to identify each open source package. A project rule is made up of a set of criteria that can uniquely identify a particular open source software package. These criteria can include factors such as file names, directories, file contents and checksums. Each project rule attempts to uniquely identify an open source project with the minimal possible set of criteria. It is important to ensure that each project rule can successfully find the target open source package, while avoiding "false positives" or conflicts with other rules.
OSS Discovery comes with a library of project rules that can identify a wide range of open source software. Community members can contribute new project rules to the library and users can also add their own custom fingerprints to find any software package in their environment.
Using existing software distribution tools, enterprises can run scans across multiple systems. OSS Discovery can be configured to deliver scans to a central server for aggregation and further analysis.
Highly configurable, OSS Discovery provides a variety of options that enable users to, among other things, specify the directories and files to scan, determine the volume and content of information reported about the scan and configure locations to send the results.
Terms and Concepts
fingerprint |
Also referred to as a project rules, this is the set of criteria used to uniquely identify a particular open source package. |
project rule |
Also referred to as a fingerprint, a project rule consists of one or more sets of match rules used to uniquely identify a particular open source project. For example, there is one project rule for Apache and another for Ant. |
match rules |
Each project rule has a set of criteria designed to recognize the project's 'fingerprint' referred to as the 'match rules'. Match rules are joined by logical operators and so are also evaluated to a Boolean expression. |
match rule |
The atomic component of the OSS Discovery rule system, an individual match rule attempts to "match" some aspect of the project. Each match rule is evaluated as "true" or "false". A "match" is the same as a 'true' value. For a more detialed explanation of the rules, please see Rule Writing for OSS Discovery 2. |
Fingerprint Live Update |
The OpenLogic service that makes updates to rules available. |
filter |
Filters and rules work in tandem to provide OSS Discovery the parameters it needs to complete a scan. A filter tells OSS Discovery to exclude particular directories or file types. |
files of interest |
Once all filters have been applied and rules examined, the resulting set of files are the 'files of interest'. This is the set of files that OSS Discovery will scan. |
Before You Start
- Users do not need any special skills to run a scan or to complete basic configuration of OSS Discovery.
- Users wishing to do advanced customization of OSS Discovery will need the following skills and information:
- A working knowledge of XML.
- A working knowledge of systems administration and networks.
- A working knowledge of the Ruby language.
Installation
To install OSS Discovery, enterprise users should:
- Obtain the archive of OSS Discovery appropriate for your operating system (.zip for Solaris and Windows, .tar.gz. for Linux).
- Unpack it in your chosen installation directory ([install dir] for the remainder of this document).
- Navigate to the discovery2-client directory and enter:
Windows: discovery.bat --path [path to scan]
Linux: ./discovery --path [path to scan]
Members of the developer community will use the same commands in the discovery2-client/main/lib directory of the source.
System Requirements
- 750KB of disk space
- 512MB or greater of RAM
- Live internet connection if scan results will be submitted or project scan rules updated
- Ruby 1.8.5 or 1.8.6 for chosen platform
- Operating systems supported and tested:
- Solaris 8,9, and 10 (SPARC)
- Red Hat Enterprise Linux 3, 4, 5 (x86)
- Windows XP, 2000, 2003 (x86)
Section 2: The Basics
For information on the basics of OSS Discovery, please refer to the following:
Section 3: Beyond the Basics
All of the parameters OSS Discovery needs to run a scan can be found in the config.yml file ( [install dir]/discovery2-client/lib/conf/config.yml). OSS Discovery ships with this file populated by a set of default values. Users have the option to override the defaults by modifying the config.yml file, or by specifying parameters on the command line when running OSS Discovery. The configuration file includes more variables than are accessible from the CLI. Users should set the properties in the config.yml file with values agreed upon by their enterprise, and then use the available CLI commands that correlate to those variables to override the established defaults.
Advanced users are provided the ability to set a property's value to the evaluated result of a snippet of Ruby code. The code must be placed between '<%' and '%>' as in the following example:
log_device =<% File.dirname(__FILE__) %>.
Setting Properties in the Custom Configuration File
Set the properties below in the config.yml file that ships with OSS Discovery ([ install dir]/discovery2-client/lib/conf/config.yml). The explanation of each property contains a link to information on the corresponding command line option if one exists. Pass the command line option to override the config.yml setting.
Properties |
Explanation |
Specify your company name or nickname. |
|
Must be a universally unique and static value. If a machine id is not specified in the configuration file, OSS Discovery will replace "default" with an id generated from characteristics of the machine. If you choose to override OSS Discovery's assigned value and you wish to submit your results for aggregation, the value you assign to each machine must be unique. Corresponding CLI Option: None |
|
Use this property to specify a directory for OSS Discovery to scan. If a directory has been specified in the inclusion filter, it will override the setting here. If --path is passed using the CLI, that value overrides both the value specified here and in the inclusion filter. Corresponding CLI Option:--path |
|
Specify which default filter set to use. Corresponding CLI Option: None |
|
Specify the location to which you would like the log results sent. This can be a filename or an IO object; typically used parameters are STDOUT or STDERR. Note that if this property is set to STDOUT and the results property is set to STDOUT, the results will be intermingled. Corresponding CLI Option: None |
|
diagnostic for developers Specify the level of information you would like included in the log results. Valid options are: FATAL, ERROR, WARN, INFO and DEBUG. 'WARN' is the recommended setting for productions runs because it typically includes important warnings while omitting most extraneous information. Corresponding CLI Option: None |
|
| log = Logger.new(LOG_DEVICE); @@log.level = LOG_LEVEL | Intended for use by developers wishing to work with the OSS Discovery code, this property allows them access to logging via a 'require cofiguration' call. Corresponding CLI Option: None |
Specifies the location to which you would like the human readable version of the scan results sent. The default prints to the screen (STDOUT). Note that if this property is set to STDOUT and the logging property is set to STDOUT, the results will be intermingled. Additionally, users can specify a filename and path. To specify a file, the user will need to create a Ruby file to write to. Corresponding CLI Option: --human-results |
|
Specifies the path and filename to which OSS Discovery should write the machine readable version of the scan results. Corresponding CLI Option: --machine-results |
|
preview_results: false |
Specifies whether or not to show the machine scan results after the scan is complete. Corresponding CLI Option: none |
include_paths: true |
Specifies whether to include location (paths) in the machine scan results file. Corresponding CLI Option: --inc-path |
Use to specify whether or not results will be sent for aggregation. When set to false, no results are sent. When set to 'true' results will be sent to the url specified by the destination_server_url property. Corresponding CLI Option: --deliver-results | |
destination_server_url = "http://192.168.10.133:3000/scans/scanpost" |
Specify the url to which results will be sent. Corresponding CLI Option: None |
Specify the port to which the user will navigate to view all project rules available on the server. This value must be followed by the value in the rules_files_url_path property. Corresponding CLI Option: None |
|
Specifies the name of the file that contains the project rules available on the server. A functional url is achieved by preceeding this value with the value in the server_base_url property. Corresponding CLI Option: None | |
If authentication is in use, set the username with this property. Should be left to 'nil' otherwise. Corresponding CLI Option: None |
|
If authentication is in use, set the password using this property. Should be left to 'nil' otherwise. Corresponding CLI Option: None |
|
Specify proxy settings for sending a scan. Check with your system administrator to determine if you've got a proxy in use. If so, adjust this property accordingly. If not, leave it set to 'nil'. Corresponding CLI Option: None |
|
Specify proxy settings for sending a scan. Check with your system administrator to determine if you've got a proxy in use. If so, adjust this property accordingly. If not, leave it set to 'nil'. Corresponding CLI Option: None |
|
Specify proxy settings for sending a scan. Check with your system administrator to determine if you've got a proxy in use. If so, adjust this property accordingly. If not, leave it set to 'nil'. Corresponding CLI Option: None | |
Specify proxy settings for sending a scan. Check with your system administrator to determine if you've got a proxy in use. If so, adjust this property accordingly. If not, leave it set to 'nil'. Corresponding CLI Option: None |
|
rules_openlogic = File.expand_path(File.join(File.dirname(__FILE__), "..", "rules", "openlogic")) |
Specify the location of the default project fingerpring rules obtained from OpenLogic. Corresponding CLI Option: None |
rules_drop_ins = File.expand_path(File.join(File.dirname(__FILE__), "..", "rules", "drop_ins")) |
Specify the location of any additional project fingerprint rules. Corresponding CLI Option: None |
Include the location of default set of project fingerprint rules and any additional rules in one property. Corresponding CLI Option: None |
|
There are a few ways to adjust the speed of a OSS Discovery scan. Using this property, you can set the default speed of the scan to one of the following values: 1 - fastest, least granular |
|
Set to the default of 'false', the scan reports only files scanned. This list will only include files the user has permission to see. The list will not include files that have been excluded from the scan based on user permissions. Corresponding CLI Option: None |
|
By default, OSS Discovery will never check to see if new project rules are available. Set this property to 'true' to check for updated project rules every time OSS Discovery is invoked, whether or not OSS Discovery has been asked to scan. Corresponding CLI Option: [--rules-update-get | --rule-update-force] | |
By default, OSS Discovery separates the actions of updating project rules and scanning./ Set this property to 'true' to link those activities and proceed with a scan every time rules are updated. Corresponding CLI Option: --update-rules |
|
By default, Ruby passes many warnings while executing an operation. This property suppresses Ruby warnings on machines that have world writable directories. The options are to leave the value 'nil', or comment it out entirely. Corresponding CLI Option: None |
|
Specify whether or not OSS Discovery should include symlink'd files in the scan. Corresponding CLI Option: --nofollow |
|
Specify the maximum number of indirections to follow through symlinks. Corresponding CLI Option: None |
Options to Pass via Command Line
Use the options in the table below to pass parameters to OSS Discovery and override the config.yml file. In the description for each relevant option is a link to the related property that can be set in the configuration file.
Along with a number of other options, the discovery.bat (Windows)/ ./discovery (Linux) command takes a path as an argument to set the directory to be scanned. Unlike all the other options which are truly optional, OSS Discovery developers recommend that a path is provided whenever OSS Discovery is run. If a path and directory are not specified, OSS Discovery will scan all directories at root and the procedure could take a very long time.
If a path is specified, which we recommend, the syntax will look like this:
Windows: discovery.bat --path [path to scan]
Linux: ./discovery --path [path to scan]
Add all other options after path. There are no rules dictating the order in which the options are passed.
Option Long Form |
Option Short Form |
Explanation |
| -p | This option tells OSS Discovery which path to scan, absolute or relative. The default is root. Corresponding property: directory_to_scan |
|
-c |
Specify the absolute or relative path and filename of the configuration file to use for the scan. By default, OSS Discovery will use the config.yml located in [install dir]/lib/conf/config.yml. Corresponding property: none |
|
-d |
Passing this option instructs OSS Discovery to deliver results to the server specified in the config.yml file. This option takes an argument optionally. -d [filename] specifies the results file to send to the server. Use this to select from many scans run with different sets of fingerprint rules and filters, or to send scans from many boxes in a distributed environment. Corresponding property: send_results |
|
-h |
View the help contents on the screen./ Corresponding property: none |
|
-u |
Adding the path and/or filename as an argument, use this option to specify where OSS Discovery should write the human readable results files. If no filename is specified, the default is STDOUT which reports results to the screen. Corresponding property: results |
|
--inc-path |
-I |
This option reports the path/location of detected packages in machine scan results. Corresponding property: include_paths |
This option prints to the screen files excluded from the scan, and the filter that excluded them. Corresponding property: None |
||
-f |
This option prints to the screen a list of all files found in the scan that matched a rule or other criteria. Corresponding property: None |
|
-g |
This option prints to the screen a list of generic filters that will be active and the directories that will be excluded, unless specified otherwise, during the next scan. Corresponding property: None |
|
-i |
After OSS Discovery applies all filters and rules, the files left are called 'files of interest', or 'foi'. These are the files that OSS Discovery will scan. This option prints the list of files of interest to the screen. Corresponding property: None |
|
-o |
This option prints to the screen the operating system, version, and distro on which discovery is running. Corresponding property: None |
|
-j |
This option prints to the screen a list of the projects that OSS Discovery is capable of finding. Corresponding property: None | |
-t |
This option prints to the screen the machine ID that will be reported with scan results. Corresponding property: None | |
-m |
Adding the filename and the absolute or relative path, use this option to specify where OSS Discovery should write the machine readable results files. The machine readable results differ from the human readable results in that they're structured so that server can parse it. By default, OSS Discovery writes machine results to scanresults.txt. Corresponding property: machine_results |
|
-S |
This option tells OSS Discovery not to follow symlinks. Corresponding property: follow_symlinks |
|
-x |
Adding any number as an argument, use this option to force OSS Discovery to provide indications of progress. A 'dot' will appear in the progress bar on the command line at each increment specified. Corresponding property: None |
|
[-G | -F] |
This option allows OSS Discovery to retrieve updates from OpenLogic to the project rules or force updates to the rules, but does not execute a scan. Parameters such as urls will come from the config.yml file. Corresponding property: update_rules |
|
-r |
This option contacts OpenLogic to obtain any updates to project rules prior to running a scan. Corresponding property: update_rules_and_do_scan |
|
-v |
This option prints to the screen the version of OSS Discovery. Corresponding property: None |
Deploying to Multiple Machines
Use the software distribution mechanism standard to your organization to distribute OSS Discovery to multiple machines. We recommend that you also collect the results files in a central location.
Section 4: Filters and Rules
How Filters and Project Rules Work
Filters and rules work in tandem to provide OSS Discovery the direction it needs to complete a scan. Filters specify directories to exclude, like the trash. Project rules tell OSS Discovery how to recognize projects as it walks the remaining directories.
Managing filters and rules can impact the performance, precision and accuracy of a scan. For example, for a fast scan, you'd exclude all extraneous directories and you'd use a filename match. To provide extra information - like what package version is installed - you'd need a filename-match and binary-match which can extract or deduce the version information from the binary. The latter would take more time because it has to read the file and perform a search for it to find a pattern that the author has defined as indicative of a version. Given all this work that it's doing, the scan will proceed more slowly. The results, however, will be more precise.
Creating New Filters
It's possible to create new scan filters, and to specify different filter sets for OSS Discovery to use when scanning a drive.
To add a new filter:
- Write the new filter using an existing example ( [install dir]/discovery2-client/lib/filters) and place the filter.rb file in the [install dir]/discovery2-client/lib/filters directory.
- Add the new filter by adding a 'require' line to the generic-exclusions.rb file (located in the [install dir]/discovery2-client/lib/filters directory ). Follow the existing syntax and OSS Discovery will pull in the new filter.
Creating New Project Rules
Users can customize a scan by leveraging existing match rules to create a new project rule for any project not already in the OSS Discovery Library. A project rule is comprised of a set of match rules configured to locate some aspect of the project. Each project has its own project rue -- Apache, for instance. Apache's project rule consists of match rules configured to find it based on its particular characteristics. The match rules in each project's rule set can be combined using logical expressions (AND, OR) and precedence operators (), so the author can describe the order in which the rules should be evaluated.
There are 4 major match rule types:
- filename matches -- matches a specific filename or regex. This is an existence check only, and will rarely provide the version.
- binary matches -- match text within binary content. This works well at retrieving version information and is commonly used for C projects and other executables where MD5 match techniques are not reliable.
- md5 checksum matches -- matches the md5 sum of given file. This is an exact match commonly used for Java projects (*.jar files).
- filenameVersion matches -- matches filename and version - This works well for files in which the word 'version' appears.
For more detailed information on creating a new project rule, see the project-rules.xml document located in [install directory]/discovery2-client/lib/rules and rule writing for OSS Discovery.
Section 5: Help and Troubleshooting
Accessing the FAQ
For assistance with specific questions, please refer to the OSS Discovery FAQ.
Accessing Support
For support, please access OSS Discovery's User mailing list. Mailing lists are moderated by the project team and every effort is made to resolve issues in a timely manner.
Reporting Bugs
If you find a problem with OSS Discovery, please visit 'Issue Tracking' area of the site and enter an issue.

This work is licensed under a Creative Commons Attribution-Share Alike 3.0 United States License.